Arguments
Description
Opens the Define Arguments Dialog that lets you define arguments.

An argument is a value that is interpreted at run-time. Arguments can be used with SQL, DBF, and Custom data source types. This feature can be very useful in filtering data to generate reports and lists of filtered data. For more on this, watch these videos on Understanding Array Arguments in Report Filters and Using Array Arguments with List Controls. In addition see the Arguments section of the documentation.
Argument Type
- Character
- Numeric
- Logical
- Date
- Time
- Y-ShortTime
- K-UUID
You can also designate that an argument is an array by pre-fixing the argument with an 'array_'.
array_country
Opening the Define Arguments Dialog
You can open this dialog by clicking on the 'Arguments' option in the Additional Options Menu on the UX Controls page toolbar.

You can also open this dialog from inside the Data Source pane in the list control's List Builder when the 'SQL', 'DBF', or 'Custom' options are selected.

Create an Argument to Filter a List
In the UX Builder on the UX Controls page open the 'Data Controls' menu. Click on the [List] option to add a list control to the component. Give the list control the name and label 'list_country'.

Highlight the list control. In the properties list on the right scroll down to the 'List Control Properties' section and click on the [...] button next to the 'List properties' property to open the List Builder.

On the Data Source pane select 'SQL' as the Data Source Type.

In the SQL Data Source properties section set the 'Connection string' property to be the 'Northwind' database.

Click the [...] button next to the 'Table name' property and select the 'Customers' table from the Northwind database.

Click the [...] button next to the 'Field list' property and select 'Country'.

Click the [...] button next to the 'Order' property and select the 'Country' field.

Check the 'Distinct' property checkbox.

Scroll down to the 'Return Value' section and set the 'Return value type' property to field and the 'Return field' property to be 'Country'.

Open the 'List Layout' pane. Use the blue > arrow to move the 'Country' field from the 'Available Fields' list to the 'Columns in List'. Click OK to close the List Builder.

Open the Data Controls menu and click on the [List] option to add a second list control to the component. Give this list control the name and label of 'list_customer'.

Highlight the 'list_customer' list control and, in the 'List Properties' section of the properties list, click on the [...] button next to the 'List properties' property to open the List Builder.

On the List Builder's 'Data Source' pane set the 'Data Source Type' to SQL.

Click the [...] button next to the 'Arguments' property in the Data Source pane's properties list. Alternatively you could use the 'Arguments' option on the Additional Options Menu to do this.

Click the 'Insert New Argument' button and give the new name argument the name 'array_country'.

In the argument's properties list on the right set the 'Get argument value from' property to be 'Set value at Run-time'

Click the dropdown next to the 'Value' property and select the {list_country} option. Click OK to close the Define Arguments dialog.

Back in the Data Source pane set the 'Connection string' property to the 'Northwind' database.

Click the [...] button next to the 'Table name' property and select the 'Customers' table.

Click the [...] next to the 'Field list' property and select 'CustomerID', 'CompanyName', 'ContactName', 'City', and 'Country' fields.

Click the [...] button next to the 'Filter' property to open the Specify Filter dialog.

In the Target Fields list double click on the 'Country (C)' field option to add it to the Filter. Use the 'Insert Argument' button to add the 'array_country' argument to the filter. Structure the filter to look like the following and click OK.
Country IN (:array_country)

Click the [...] button next to the 'Order' property and select the 'Country' field.

Open the 'List Layout' pane and use the blue > arrow to move the 'CustomerID', 'CompanyName', 'ContactName', and 'City' fields from the 'Available Fields' list to the 'Columns in List' section. Click OK to close the list builder.

Highlight the 'list_country' control, the first list control in the controls tree. Again go to the List Properties section and click on the 'List properties' property to open the List Builder.

At the bottom of the List Builder click on the 'List Events' button to open the 'List Control System Events' dialog.

In the list of system events highlight the 'onClick' event.

Add the following javascript code to the onClick event's definition. Click OK to return to the List Builder and OK again to close the List Builder.
{dialog.object}.refreshListData('list_customer');
Run the component in Live Preview. Highlight a country in the countries list. You should see the data for all the customers from that country displayed in the 'Customers' list.

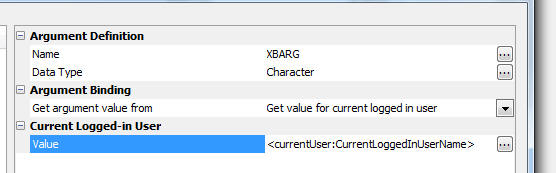
Creating an Argument for the Current User's ID or Security Groups
When you define Arguments, you can bind an argument to the id of the currently logged in user or the security groups of the currently logged in user.
In the case where you bind an argument to the security groups for the logged in user, you must define an array argument. A user can be a member of multiple groups. By defining an array argument (the argument name must start with ARRAY_), the argument can be used in a SQL IN clause. For example
SELECT * FROM tasklist WHERE group IN (:ARRAY_UserSecurityGroups)
If you are using Active Directory, or IIS (with the Alpha Anywhere plugin), the Security Groups are the actual names of the security groups. In the case of the classic Alpha Anywhere server, the security groups are the GUIDs for each group.
To specify that an argument gets its value from the currently logged in user, set the Get argument value from property to Get value for current logged in user. Then set the Value property to one of the following options.
- Value Option
- Description
- CurrentLoggedInUserName
The user ID for the currently logged in user.
- CurrentLoggedInUserGroups
The groups for the currently logged in user. A user may belong to multiple groups. Specify the Argument as an array argument by prefixing the argument's name with ARRAY_. E.g. ARRAY_UserSecurityGroups.
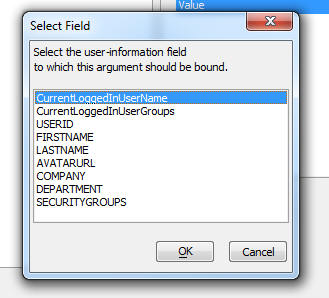
Using Extended User Information in Arguments
If you have defined an Extended User Information Table for the current project, the Select Field dialog for the Value property will include fields defined in the Extended User Information Table. You can bind an argument to any value from the Extended User Information Table. The available fields will be listed after the CurrentLoggedInUserName and CurrentLoggedInUserGroups choices.
See Also